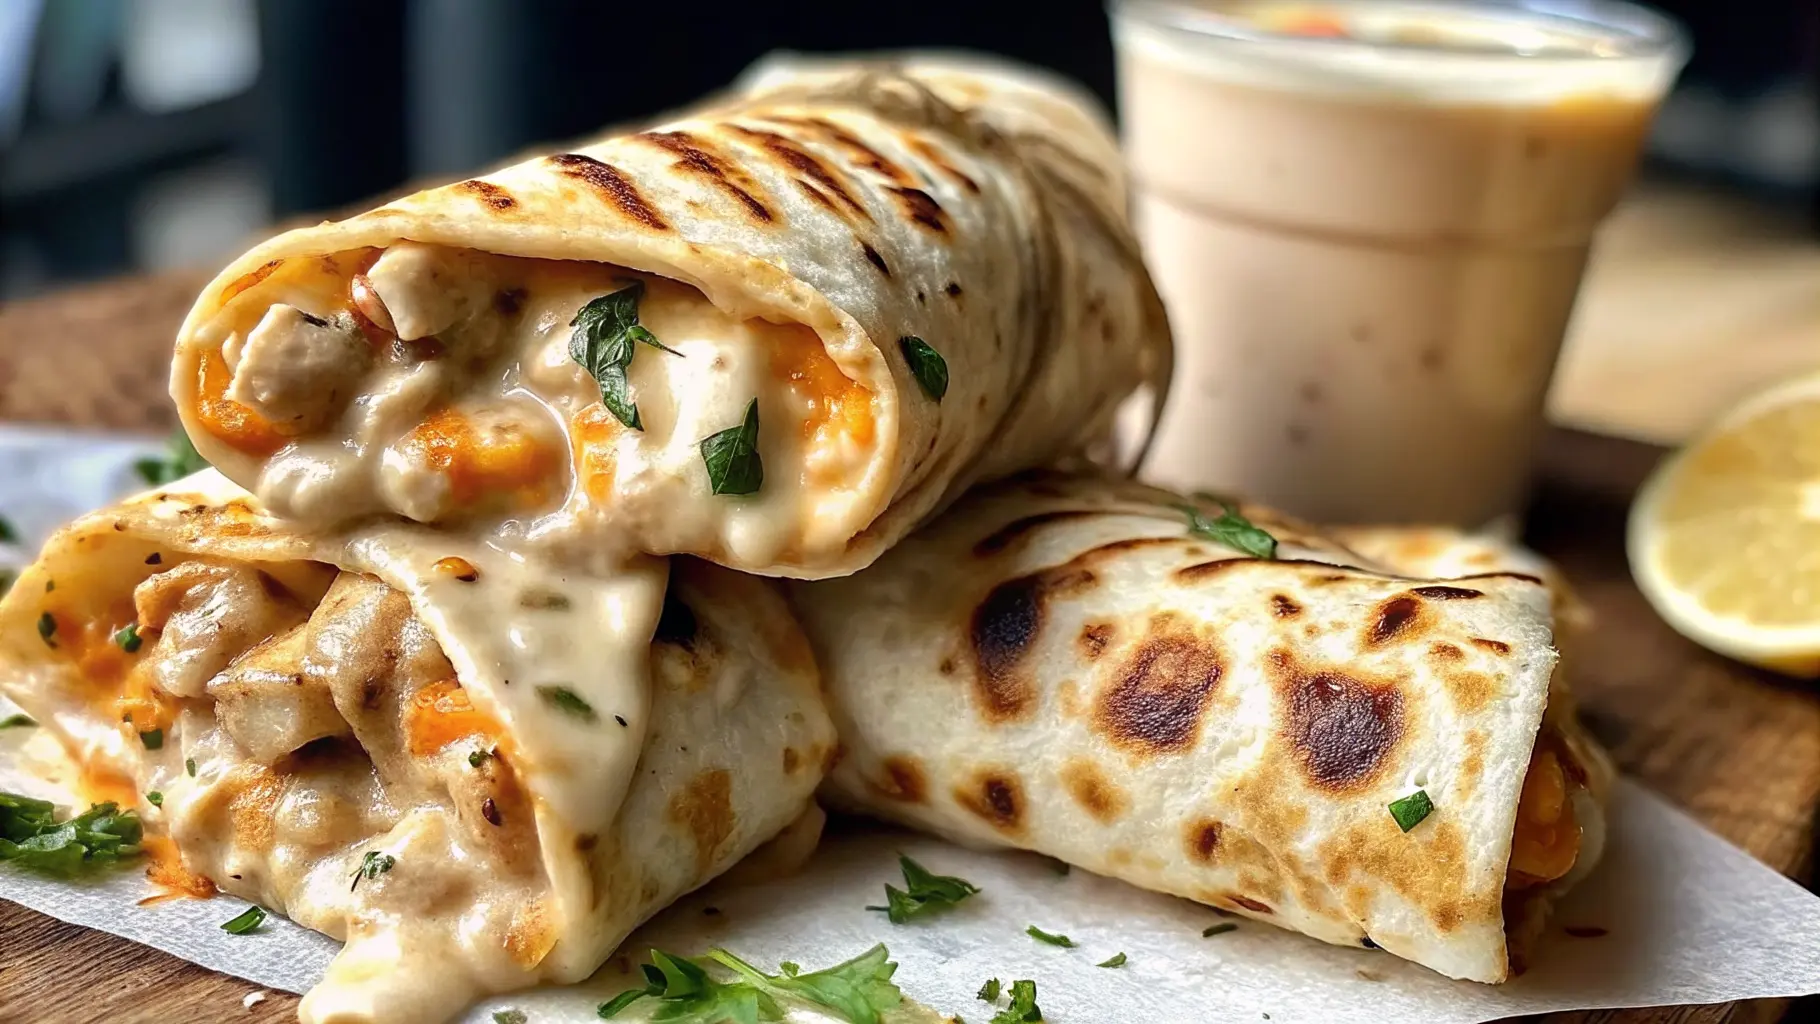
Craving a quick and satisfying meal that’s bursting with cheesy goodness? This Quick Cheesy garlic Chicken Wrap is the perfect solution for busy days, whether you need a speedy lunch, an easy dinner, or a delicious meal prep idea. Juicy, seasoned chicken meets gooey melted cheese, all wrapped in a warm tortilla with a hint of garlic for extra flavor.
What makes this wrap so irresistible? It’s incredibly versatile! Customize it with your favorite cheeses, add a spicy kick, or toss in fresh veggies for a healthier twist. Whether you grill, pan-fry, or bake it, this cheesy garlic chicken wrap is guaranteed to be a crowd-pleaser. Ready to make your new favorite wrap? Let’s get started!
Why You’ll Love This Recipe
If you’re looking for a meal that’s quick, cheesy, and packed with flavor, this Quick Cheesy Chicken Wrap is exactly what you need. Whether you’re whipping up a speedy lunch, a fuss-free dinner, or a meal-prep option that stays delicious, this wrap checks all the boxes.
Essential Ingredients
Creating the perfect Quick Cheesy Chicken Wrap starts with simple yet flavorful ingredients. Here’s what you’ll need to bring this delicious wrap to life:
Main Ingredients:
- Chicken Breast – Boneless, skinless, and thinly sliced for quick cooking and maximum juiciness.
- Tortilla Wraps – Use soft flour tortillas for a classic texture, or opt for whole wheat or gluten-free alternatives.
- Cheese – Cheddar, mozzarella, or a Mexican blend melt beautifully, creating that irresistible gooey texture.
- Garlic – Freshly minced for a rich, savory depth of flavor.
- Olive Oil – Helps achieve a golden, slightly crispy texture on the chicken.
- Seasonings – A mix of salt, pepper, smoked paprika, and a touch of chili powder enhances the flavor perfectly.
Optional Add-Ins for Extra Flavor:
- Fresh Veggies – Sliced bell peppers, spinach, or red onions add crunch and nutrition.
- Creamy Sauce – A drizzle of ranch, garlic aioli, or spicy sriracha mayo takes the wrap to the next level.
- Avocado or Guacamole – Adds a creamy, buttery contrast to the cheesy filling.
Ingredient Tips:
For extra tender chicken, marinate it for 15 minutes with olive oil, garlic, and seasonings before cooking.
Want an extra crispy wrap? Lightly toast the assembled wrap in a pan for a golden, crunchy finish.
Choosing the right cheese? A mix of cheddar and mozzarella gives the best combination of bold flavor and perfect melt.
With these essential ingredients and simple tips, you’re all set to create a wrap that’s packed with flavor. Now, let’s move on to assembling the perfect cheesy garlic chicken wrap!
Creating Perfect Cheesy Garlic Chicken Wraps
Now that we have all the ingredients ready, let’s walk through the simple steps to make these irresistibly cheesy, garlicky chicken wraps. Whether you’re cooking for yourself or feeding a crowd, these wraps come together quickly with just a few key techniques.
Step 1: Cook the Chicken
- Add a drizzle of olive oil to a skillet over medium heat.
- Season the chicken with salt, pepper, smoked paprika, and chili powder for a bold, savory flavor.
- Cook for 5-7 minutes per side until golden brown and fully cooked (internal temperature of 75°C or 165°F).
- Add the minced garlic during the last minute of cooking, stirring to coat the chicken in its rich aroma.
- Remove from heat and let it rest for a couple of minutes before slicing into thin strips.
💡 Pro Tip: Cutting the chicken into thin slices before cooking helps it cook faster and absorb more flavor.
Step 2: Assemble the Wraps
- Lay a tortilla flat and sprinkle a generous layer of shredded cheese in the center.
- Add the sliced chicken on top of the cheese to help it melt perfectly.
- Customize your wrap by adding fresh veggies, a creamy sauce, or a few slices of avocado.
- Fold the sides inward, then roll the wrap tightly from the bottom up, ensuring all the fillings stay inside.
💡 Pro Tip: To prevent your wrap from getting soggy, place a layer of lettuce between the tortilla and any wet ingredients like sauces or tomatoes.
Step 3: Toast for the Perfect Finish
- Heat a clean skillet over medium heat. Lightly grease with butter or olive oil.
- Place the wrap seam-side down and cook for 1-2 minutes until golden brown and crispy.
- Flip and repeat on the other side until the cheese is melted and the wrap is lightly toasted.
💡 Pro Tip: If making multiple wraps, keep them warm by placing them in a low-temperature oven (90°C or 200°F) until ready to serve.
Once toasted, slice the wrap in half and serve immediately. The result? A crispy, cheesy, garlicky chicken wrap that’s bursting with flavor in every bite! Now, let’s explore some fun variations to make this recipe your own.
Creative Variations
One of the best things about this Quick Cheesy Chicken Wrap is how easily it can be customized! Whether you’re looking for a spicy kick, a vegetarian alternative, or a healthier twist, these creative variations will keep things exciting.
1. Spicy Buffalo Chicken Wrap
Love some heat? Try this bold variation:
- Before assembling, toss the cooked chicken in the Buffalo sauce.
- Use pepper jack cheese for extra spice.
- Add crisp lettuce and a drizzle of ranch or blue cheese dressing for balance.
💡 Pro Tip: For an extra-crispy wrap, toast it in the skillet with a touch of butter for a golden crust.
2. Mediterranean-Inspired Wrap
For a fresh and flavorful twist, go Mediterranean:
- Swap the cheese for crumbled feta and use whole wheat tortillas.
- Add sliced cucumbers, cherry tomatoes, and red onions for crunch.
- Drizzle with tzatziki sauce or a squeeze of lemon juice.
💡 Pro Tip: Sprinkle a little dried oregano on the chicken for an authentic Greek touch!
3. Vegetarian Cheesy Wrap
Skip the chicken and still enjoy a cheesy, satisfying wrap:
- Use grilled mushrooms, zucchini, or roasted chickpeas for a hearty filling.
- Swap regular cheese for a mix of mozzarella and smoked gouda for depth of flavor.
- Add hummus or mashed avocado for extra creaminess.
💡 Pro Tip: A sprinkle of smoked paprika gives roasted chickpeas a delicious, smoky flavor.
4. Protein-Packed Low-Carb Wrap
Looking for a keto-friendly or low-carb option? Try this:
- Replace the tortilla with large lettuce leaves or a keto wrap.
- Use grilled chicken thigh meat for extra juiciness.
- Add a dollop of Greek yogurt mixed with garlic and herbs instead of a heavy sauce.
💡 Pro Tip: Lightly char lettuce wraps on the stovetop for a hint of smokiness without losing their crunch!
No matter which variation you choose, these cheesy chicken wraps are endlessly adaptable to suit your taste. Now, let’s explore how to make them ahead and keep them fresh like a pro!
Make-Ahead and Professional Chef Tips
Want to save time without sacrificing flavor? These Quick Cheesy Chicken Wraps are perfect for meal prep and can be stored, reheated, and even made ahead with a few pro tips.
How to Make These Wraps Ahead of Time
Cook the Chicken in Advance – Grill or pan-fry the seasoned chicken up to 3 days ahead and store it in an airtight container in the fridge. When ready to assemble, simply reheat and add to your wrap.
Pre-Chop Ingredients – Slice vegetables, shred cheese, and prepare any sauces beforehand to make assembly effortless.
Assemble, but Don’t Toast Yet – If you plan to eat them later, roll the wraps up and store them in the fridge without toasting. This keeps them fresh and prevents sogginess. When ready to serve, toast them in a pan for that perfect crisp finish.
Best Ways to Store & Reheat
- Refrigerate: Wrap assembled (but untoasted) wraps in foil or parchment paper and store them in an airtight container for up to 3 days.
- Freeze: For longer storage, wrap each wrap tightly in plastic wrap and place in a freezer-safe bag for up to 2 months.
- Reheat: Warm in a skillet over medium heat for 2-3 minutes per side until heated through and crispy. You can also use an air fryer at 180°C (350°F) for 5 minutes.
Pro Tip: If microwaving, place a damp paper towel over the wrap to prevent it from drying out.
Chef’s Secrets for the Best Wraps Every Time
Use freshly shredded cheese – It melts more smoothly than pre-packaged shredded cheese, which often contains anti-caking agents.
Toast the wrap seam-side down first – This helps seal the edges so the fillings stay inside.
Avoid overfilling – Too much filling makes rolling difficult and can cause the wrap to burst open while cooking.
By following these tips, you can enjoy crispy, cheesy, and flavor-packed wraps anytime! Now, let’s tackle some frequently asked questions to ensure your wraps turn out perfect every time.
FAQs
Got questions about making the perfect Quick Cheesy Chicken Wrap? Here are the answers to the most common ones!
1. Can I use rotisserie or leftover chicken?
Absolutely! Shredded rotisserie chicken or leftover grilled chicken works great in this recipe. Simply reheat it with a little olive oil and garlic to enhance the flavor before assembling your wrap.
2. What’s the best cheese for melting?
For the ultimate gooey texture, use:
- Cheddar – Bold and flavorful.
- Mozzarella – Melts beautifully for a stretchy texture.
- Monterey Jack – Smooth and creamy.
- Mexican Cheese Blend – A mix of flavors with perfect meltability.
3. How do I prevent my wrap from getting soggy?
- Layer smartly: Place lettuce or cheese as a barrier between wet ingredients (like tomatoes or sauce) and the tortilla.
- Use a thicker wrap: A sturdy tortilla holds up better than thin ones.
- Toast before serving: This creates a crisp exterior that helps seal in moisture.
4. Can I make these wraps gluten-free or low-carb?
Yes! Simply swap the flour tortilla for:
- Gluten-free tortillas – Available in most stores.
- Lettuce wraps – For a low-carb alternative.
- Almond or coconut flour wraps – Great for keto-friendly options.
5. Can I air-fry these wraps?
Yes! To get a crispy, golden-brown wrap, air-fry at 180°C (350°F) for 5-6 minutes, flipping halfway through. This method locks in flavor while keeping the wrap crispy on the outside.
6. What dips pair well with these wraps?
- Garlic aioli – Creamy and rich.
- Sriracha mayo – Adds a spicy kick.
- Tzatziki – Light and refreshing.
- BBQ sauce – Sweet and smoky.
No matter how you customize it, these cheesy chicken wraps are a guaranteed hit. Enjoy experimenting with different flavors and techniques to make them your own!
Quick Cheesy Chicken Wrap
Equipment
- Skillet or grill pan
- Cutting board & knife
- Spatula
- Mixing bowls
Ingredients
For the Chicken:
- 2 boneless skinless chicken breasts
- 1 tbsp olive oil
- 2 cloves garlic minced
- ½ tsp smoked paprika
- ½ tsp chili powder
- Salt & pepper to taste
For the Wraps:
- 4 large flour tortillas
- 1 cup shredded cheese cheddar, mozzarella, or Monterey Jack
- ½ cup lettuce shredded
- ¼ cup diced tomatoes
- ¼ cup sour cream or garlic aioli optional
- 1 tbsp butter or olive oil for toasting
Instructions
Step 1: Cook the Chicken
- Heat a skillet over medium heat and add olive oil.
- Season the chicken with smoked paprika, chili powder, salt, and pepper.
- Cook for 5-7 minutes per side until golden brown and fully cooked.
- Add the minced garlic during the last minute, stirring to coat the chicken.
- Let the chicken rest for a few minutes, then slice into thin strips.
Step 2: Assemble the Wraps
- Place a tortilla on a flat surface and sprinkle shredded cheese in the center.
- Add sliced chicken, lettuce, tomatoes, and a drizzle of sour cream (if using).
- Fold the sides inward, then roll tightly from the bottom up.
Step 3: Toast for a Crispy Finish
- Heat a clean skillet over medium heat with a little butter or oil.
- Place the wrap seam-side down and cook for 1-2 minutes per side until golden brown.
- Remove, slice in half, and serve warm!
Notes
- For a spicier version, add jalapeños or a drizzle of hot sauce.
- These wraps are great for meal prep—store them in the fridge for up to 3 days and reheat in a skillet or air fryer for best results.